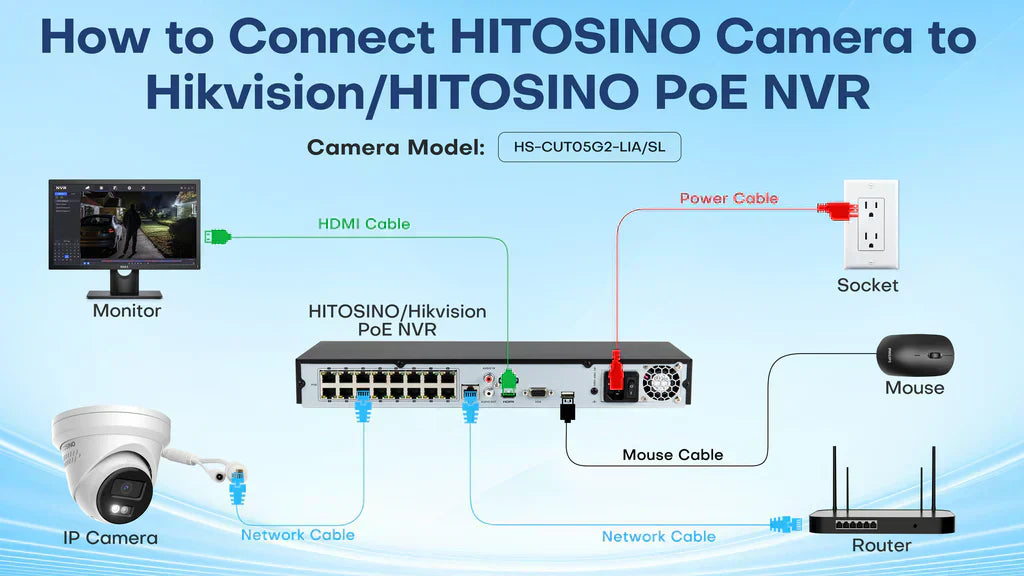
In our previous guide, we discussed how to set up cameras using power adapters, switches, and non-PoE NVRs. However, using a PoE NVR is the most efficient and streamlined option. It simplifies installation by powering cameras and transmitting data through one Ethernet cable. In this article, we’ll show you how to easily connect HITOSINO cameras to a Hikvision or HITOSINO PoE NVR for seamless video surveillance and remote access via apps like Hik-Connect.
Follow this guide to quickly configure your system and start monitoring your cameras efficiently!
Preparation
Before starting, make sure you have:
- Camera Factory Reset: The camera is reset to its factory default settings.
- Ready-to-Go NVR: The Hikvision Non-PoE NVR is activated and connected to a monitor.
- Apps Installed: The Hik-Connect and Guarding Vision apps are installed on your smartphone, and you've logged into your account for remote access.
- Surveillance-Grade HDD Installed: A surveillance-grade hard drive is installed in the NVR to ensure smooth video playback and recording.
Now that your preparations are complete, let's briefly review the key components involved in setting up your surveillance system. Understanding their roles will make the setup easier.
Connection Diagram

Brief Introduction of Components Table
|
Image |
Device Name |
Function |
 |
Hikvision PoE NVR | Records video from the camera and allows live viewing and playback on a monitor |
 |
Router | Connects the camera to your network for remote viewing via the Hik-Connect or Guarding Vision app |
 |
Monitor | Displays live feeds and recorded footage from the NVR for easy monitoring. |
 / /
|
HDMI or VGA Cable | Connects the NVR to the monitor, allowing live video viewing |
 |
Smartphone | View and control the camera remotely with the Hik-Connect or Guarding vision app |
 |
Network Cable | Link the camera, PoE switch, router, and NVR for seamless data transfer |
Next, let’s move on to the actual setup.
1.Add your camera to Hikvision/HITOSINO PoE NVR
Once the HITOSINO camera is connected to the PoE port of your Hikvision or HITOSINO PoE NVR, the camera will be automatically detected and displayed on the monitor connected to the NVR—no manual setup is required. This plug-and-play feature ensures that your camera is ready for immediate use.
Next, let’s explore how to view your system through Hik-Connect.
2. View Your Camera on NVR via Hik-Connect/ Guarding Vision
You can use either the Hik-Connect or Guarding Vision app to view Hikvision or Hikvision-made devices on your smartphone. Guarding Vision is designed for Hikvision OEM devices, while Hik-Connect is for Hikvision-branded ones. Although both apps function similarly, Hik-Connect is recommended as it receives more frequent updates and may offer more features. In this article, we use Hik-Connect as an example.
To ensure Hik-Connect works seamlessly, it's important to confirm that the NVR has a valid IP address. Enabling DHCP is the simplest and most effective method to achieve this, though you can manually set a static IP if preferred. In this guide, we will use DHCP as an example.
1. Enable Hik-connect/ Guarding Vision
Step 1. Enable Automatic Network Settings:
Navigate to the Configuration>Network>General, make sure both DHCP and Auto Obtain DNS are enabled. This allows your NVR to automatically receive a valid IP address from the router.

Step 2. Enable Hik-Connect:
Go to Platform Access, and activate the Hik-Connect service. When you activate the Hik-Connect service, you will be asked to agree to the terms of service and policy statement. Finally, click OK in the pop-up windows.

Here’s a simple explanation of Stream Encryption: it's a feature that protects your video streams by requiring a password for access. If you leave it enabled, you'll need to enter a password to view the live stream or playback of your camera's video. If you prefer faster and easier access to your camera streams, you can disable it. In this article, we have Stream Encryption disabled to demonstrate the setup process more easily.
Step 3. Save the settings:
Finally, click Apply to save the configuration.

Up to this point, the NVR configuration is complete. Make sure the Connection Status is Online.

Next, add your Hikvision/HITOSINO NVR to your smartphone using the Hik-Connect application, this will ensure you to monitor your cameras remotely from everywhere. We assume your NVR has not yet been added to Hik-Connect.
2. Add your NVR to Hik-Connect
Step 1. Add your Device:
Open the Hik-Connect App, click Add Device, and select Scan QR Code options to add your Hikvision NVR.

Step 2. Scan the QR code:
Point your camera to the QR Code found in the Platform Access menu. The QR Code refer to Figure 2-4. Once the scan is successful, click Add. Once the scan is successful, click Add.

The message Adding Completed with green check mark indicates that you have successfully added your Hikvision device to the Hik-Connect application. Click Finish to complete the steps.

Once your NVR is added, click Camera 01 in the Hik-Connect to check if the camera feed is displaying correctly. If not, make sure your camera is properly connected to Hikvision/HITOSINO NVR.

Conclusion
In conclusion, while setting up your HITOSINO camera with a PoE NVR is straightforward, make sure to check network compatibility and firmware updates to avoid any issues. Stay tuned for more guides on optimizing your system and resolving common setup challenges.
For more tutorials on camera setup or troubleshooting, visit our FAQ and support center for more resources, and contact us at support@hitosino.com.
Additional resources
Operational articles
- How to Use a HITOSINO Camera Standalone with a Power Adapter
- How to Use a HITOSINO Camera Standalone with a PoE Switch
- How to Connect HITOSINO Camera to Hikvision-HITOSINO Non PoE NVR

