
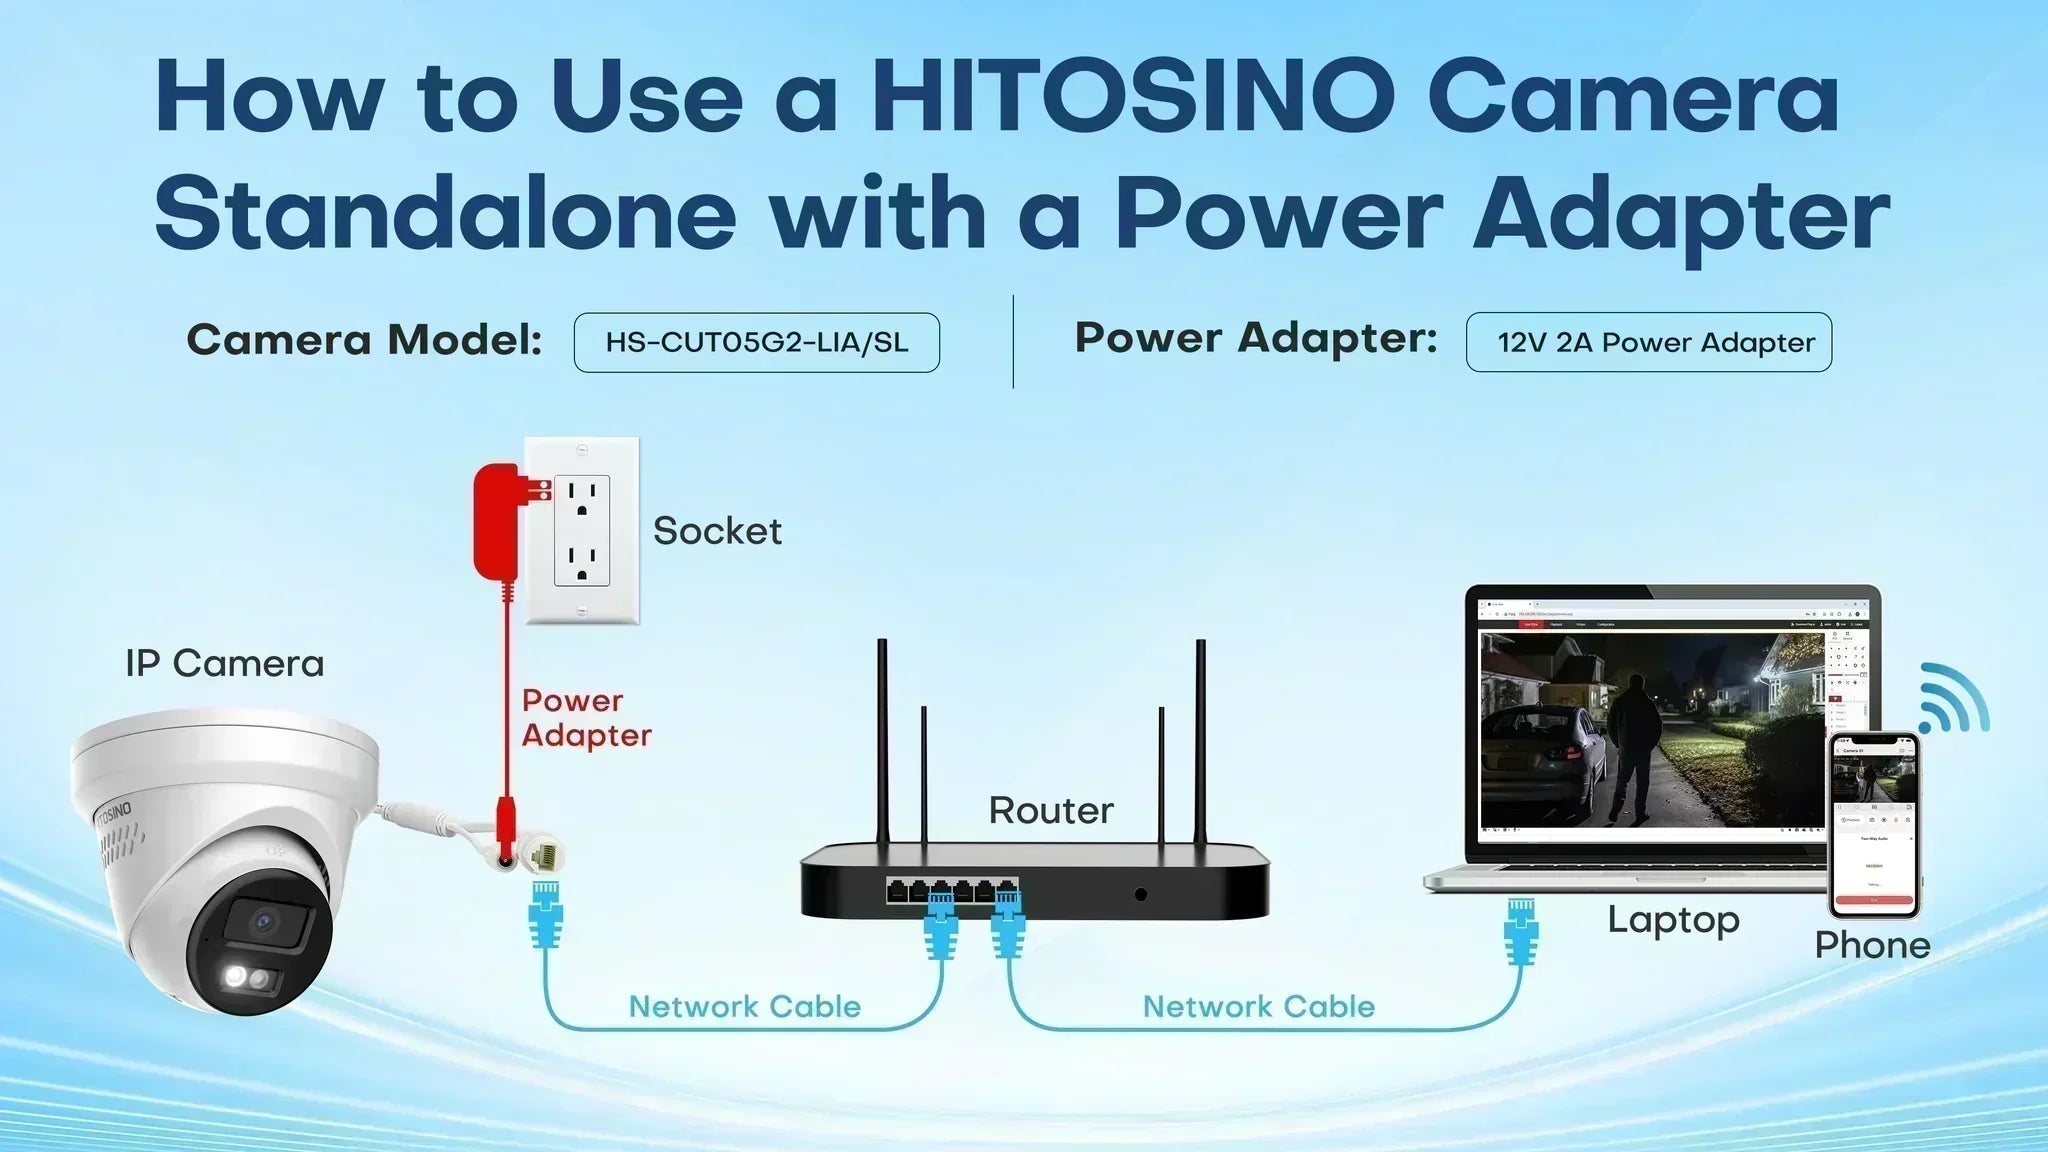
In this guide, we'll focus on using a HITOSINO camera standalone with a power adapter and walk you through the setup process. This method provides a simple and effective way to power your camera, especially when PoE is not available or convenient.
Preparation
Before beginning the setup, ensure you have everything ready:
- Reset camera: Reset your HITOSINO camera to its factory default settings or make sure it is new and unconfigured.
- Install SADP and iVMS-4200: Download and install the SADP Tool and iVMS-4200 on your computer to activate and configure the camera.
- Install Hik-Connect or Guard Vision: Install the Hik-Connect or Guard Vision app on your smartphone, and create an account for remote access and control.
- Install SD Card: An SD card should be installed for playback.
Before diving into the setup process, it’s important to familiarize yourself with the key components and their functions. Understanding how each part works together will give you a clearer picture of how to achieve seamless surveillance. Let’s take a quick look at them.
Connection Diagram

Brief Introduction of Components Table
| Image | Device Name | Function |
 |
Power Adapter | Provides 12V/2A power to the camera |
 |
Router | Connects the camera to your network for remote viewing via the Hik-Connect or Guarding Vision app |
 / / |
Laptop or Computer | Used for initial setup, including activating the camera and configuring functions via software or web browser |
 |
Smartphone | View and control the camera remotely with the Hik-Connect or Guarding Vision app |
 |
Network Cable | Ensures stable data transfer between the camera and your router or computer |
Now let’s move on to the actual setup. This covers everything from activating your HITOSINO camera to configuring it for access via a web browser, iVMS-4200, and the Hik-Connect app, along with the best use cases for each method. We'll start with the first step—activating your camera.
Activate your HITOSINO Camera
This step is essential to secure your camera, set a password, and enable all features. It’s quick and easy, but without it, recording and remote viewing won’t work. Let’s walk you through the activation process.
1. Open SADP
Run SADP on your computer. Your camera will appear in the list. If not, click Refresh.

Figure 1-1
2. Select and activate the camera
Check the box next to the camera, input and confirm the password carefully. Be sure to carefully note and remember your password, as it will be required for future access and changes.

Figure 1-2
3. Successful activation
The green check indicates the IP camera has been activated successfully.

Figure 1-3
4. Set security questions
Enter a valid email address and/or set up security questions for password recovery.

Figure 1-4
IP Address Setup
Configuring the correct IP address is crucial for ensuring that your HITOSINO camera can communicate with your network and allow remote access. Without a proper IP setup, the camera may not function correctly or be accessible. There are two ways to configure the camera’s IP address:
1.Automatically obtain a valid IP address via DHCP
HITOSINO Value series cameras have DHCP enabled by default, with the box already checked in the SADP tool. If your router supports DHCP, it will automatically assign an IP address to the camera.
Figure 1-5
Note: For other HITOSINO cameras, DHCP may not be enabled by default. To obtain an IP address automatically, you need to check the box next to Enable DHCP in the SADP tool.
2.Manually set an IP address
If you prefer set the IP address manually, uncheck the Enable DHCP box. Then, enter your desired IP address, making sure it's in the same network as your router and doesn’t conflict with other devices. Finally, enter your password and click Modify to save the changes.

Figure 1-6
Once activated, you can access your camera through three main methods. The first is via a web browser, which is necessary to configure essential settings, such as enabling Hik-Connect for remote access.
Access your camera via Web Browser
- Supported Devices: Computer
- Main Features: Live view, Detailed configuration.
- Suitable For: Advanced users who need more granular control and detailed settings configuration. This method is ideal for users who are configuring a single device and prefer to avoid installing additional software.
Accessing Steps:
1.Access the camera’s web interface:
Double-click the camera’s IP address to access the camera’s login page.

Figure 2-1
2. Log into the web browser
Enter the username ‘admin’ and password you set during activation.

Figure 2-2
3. Enable Hik-Connect and Guarding Vision via DHCP
To make sure you can view your camera on Hik-Connect or Guarding Vision, we need to enable it first here.
Go to Configuration>Network>Advanced Settings>Platform Access to enable Guarding Vision.

Figure 2-3
Once enabled, both Guarding Vision and Hik-Connect will work.
4. Create a verification code: Enter and confirm the verification code, then click Save to activate Guarding Vision.

Figure 2-4
This code is required for remote viewing via Hik-Connect and Guarding Vision, so make sure to keep it safe.

Figure 2-5
5. Check the Register Status:
Click another menu or refresh the page. If the Register Status displays “Online”, your camera is now accessible on your smartphone via Hik-Connect and Guarding Vision. If it shows “Offline”, check your network connection and ensure the camera is properly connected to the router.

Figure 2-6
Note: Guarding Vision is designed for Hikvision OEM devices, while Hik-Connect is for Hikvision-branded ones. Although both apps function similarly, Hik-Connect is recommended, as it receives more frequent updates and may offer more features compared to Guarding Vision.
Access your camera via IVM4200
- Supported Devices: Computer
- Main Features: Device management, live view, recording, playback, system management, advanced features.
- Suitable For: Users managing multiple cameras or large systems. This method is best for users who need comprehensive device management and advanced features like batch configuration and recording management.
Accessing Steps:
1. Open iVMS-4200: Launch the iVMS-4200 software on your computer.
2. Add camera to the iVMS-4200:
Go to Device Management>Online Device, check the box next to your computer on the list, then click Add. Name your camera, enter the username “admin” and password, then click Add.

Figure 3-1
If you see the status display as “Online” with a green check mark, it indicates the camera has been successfully added.

Figure 3-2
4. View the camera feed: Click Main View and double-click the test folder to check the live camera feed.

Figure 3-3
Access your camera via Hik-Connect
Once this step is completed, you'll be able to remotely monitor your camera from anywhere and receive real-time notifications.
We’re using the Hik-Connect version [6.5.600.20240731.4] in this article, but keep in mind that the interface may vary with future updates.
- Supported Devices: Smartphone or Tablet
- Main Features: Live view, playback, basic settings management share device, real-time notifications, remote access.
- Suitable For: Everyday users or those needing to monitor on-the-go. This method is ideal for users who prefer mobile monitoring and quick, convenient control of their camera.
Accessing Steps:
1. Log into the Hik-Connect app via your smartphone: Open the Hik-Connect app and log into your account.
2. Add your camera
While scanning the QR code is the easiest option, sometimes manual adding is necessary. If the QR code can’t be scanned, you can enter the serial number by hand. So we introduce two approaches here, you can choose the method that best suits your needs.
- Scan QR Code: Find the QR code on the camera or its packaging, then scan it using the app's "+" button. Follow the prompts to complete the process.
- Add Device Manually: Select "Add Device Manually" and enter the camera’s serial number found on the device or in the system settings.

Figure 4-1
How to find the serial number:
You can find the serial number on the box label, the camera label, or by navigating to Configuration > System > Settings > Basic Information on the web interface.
Box label

Figure 4-1
Camera label
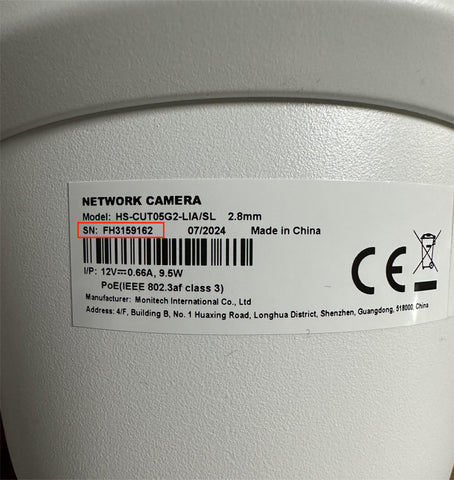
Figure 4-2
Web interface

Figure 4-3
Path: Configuration>System>Settings>Basic Information
Now, let's continue the same processing steps.
3. Input and Save Verification Code: Enter the verification code you created, then click Save.

For the verification code, please refer to images 2-4.
Once you see the green check mark, the camera is successfully added and ready for remote viewing.

4. Verify the connection: After adding the camera, check the device status in the app.

Now that you’ve learned how to access your camera, here are some practical tips to help you get the most out of your setup and avoid common pitfalls.
Tips:
1. Use high-quality Ethernet cables to ensure a reliable connection.
2. Position the camera and router within a reasonable distance to avoid signal interference.
3. Ensure your computer and router are on the same LAN for proper connectivity.
Conclusion:
In summary, using a HITOSINO camera with a power adapter offers a flexible and reliable solution for various surveillance needs. By following these steps, you can easily configure and operate your camera in different environments.
If you continue to experience issues, feel free to contact us at support@hitosino.com. You can also visit our FAQ and support center for more resources.
Additional Resources:
Youtube tutorials
Operation articles:
How to Use a HITOSINO Camera Standalone with a PoE Switch
How to Connect HITOSINO Camera to Hikvision/HITOSINO Non-POE NVR
How to Connect HITOSINO Camera to Hikvision-HITOSINO PoE NVR